
Saving Your Project
The orange buttons in the top left of the project indicate your options for saving your project.
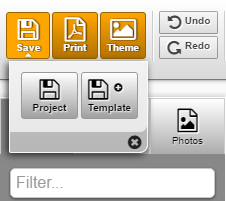
When you click Save in the top left, there will be two buttons that will appear below.
The Project button will save your project to the current record you are working in.
The Template save option will create a template for use in other records.
The Print button will save your stationery project as a PDF document and download it to your computer. You can then print a hard copy if you choose. These Print On Demand projects are meant to be printed on pre-printed paper, so only the data will print onto the stationery.
The Theme button will allow you to change the theme of your project.

Any edits you make, you have the option to undo or redo an action.
Navigating Your Project
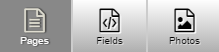
Pages: will display all pages for the project you are working on. Some only include the one page. If you see more than one, you can click on the others to view/edit.
Fields: allows you to add fields onto your stationery. These fields will pull the data from the record. To learn more, refer to the Adding Text Fields section below.
Photos: will show all photos within this record. To learn more about photos, refer to Photos section below.
Editing Your Project
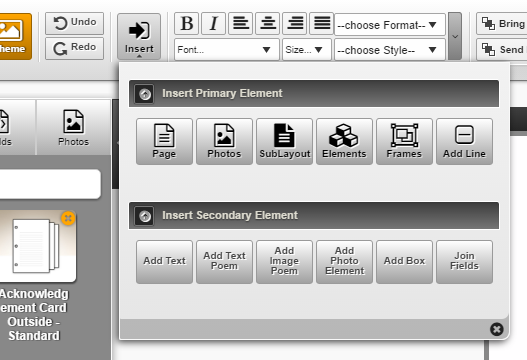
Click the Insert button to add features to your project.
Adding Pages
Pages may only be added to Register Books.
Click Insert and within the window that pops open, click the Page button.
Select a page you want to add to your project, by clicking the + sign.
It will then open that page on your project in which you can edit if needed.
Adding Photos
Upload a New Photo
 Click the Insert button and then click the Photos button.
Select Add files, locate the image on your computer, click Open, and Start Upload. Once uploaded, it will be available within the Photos section on the left.
There is a drop down available at the top of this section which will either show all photos from within the record or your company logo.
Adding Frames & Inserting Photos
Some stationery pages have a frame already within the project. You can add a photo to this frame by following these steps:
- Click the empty frame from your stationery project.
- Click the Photos section on the left. All photos from this record will be available to choose from.
- Click on a photo from the left. The photo will load into the frame.
- Use the wheel on your mouse to zoom the photo in or out.
- If you wish to move the photo around, click the red dot (in center of frame) and drag the photo where you want to place it.
p(banner tip). For advanced users, when you click on the photo an Image Tools popup will appear. You can reference the Image Positions section and adjust the numbers. - You can make the whole frame with photo larger by clicking on it and dragging the corner boxes you see out.
For stationery projects without an automatic frame, you can add your own frame.
There are different frame sizes and styles you can add around your photo.
You can either click on the photo you want from the left display panel and then select a frame,
or you can click the Frames button and then select a photo.

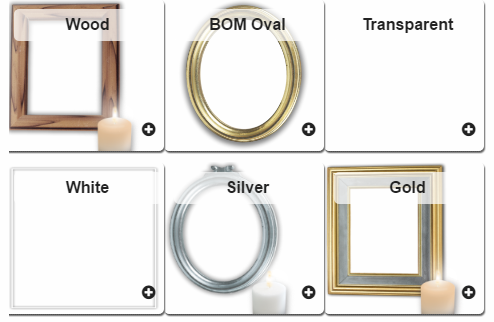
Either way, the frame will load around your image.
Use the wheel on your mouse to zoom the photo in or out.
If you wish to move the photo around, click the red dot (in center of frame) and drag the photo where you want to place it.
You can make the whole frame with photo larger by clicking on it and dragging the corner boxes you see out.
Make sure you do not go outside of the background image or dotted lines.
Adding Elements
Click Insert and then Elements
Click the + sign for the element you want to add. This will place it on your project.
Click on the element and drag it to where you want it to appear on your project.
Adding Lines
This will allow you to place a horizontal line on your page. This would be used if you are looking to print so text can be written above the line.
Click Insert and then Add Line
This will insert the line on your project. When your line is clicked on, you can adjust the length by dragging the field boxes out.
If you want to remove the lines, click the Dotted Square button.
Adding Text Fields
There are two options for adding text fields.
- Add a field to pre-populate the data from the record.
- Add your own text field, which would not pull from the record. This can be either data you manually enter or a poem.
Add a field to pre-populate the data from the record.
Click the Fields button to the left.
Use the drop down and/or search box to narrow down your results.
Once you have found the field you want to add, click on it and drag it to your stationery project. Make sure to place it where you want it to appear on the stationery.
Once it is on the stationery, it will automatically change the name of the field to the data from the record.
You will see buttons above allowing you to adjust the alignment. This only aligns the text within the field, NOT the field on the project.
When your field is clicked on, you will see little boxes along the outline of your field. You can click these to make your field larger or smaller. Make sure you do not go outside of the background image or dotted lines.
Add your own text field.
This is used if you want to add your own custom text.
Click Insert and then Add Text
A new text field will appear at the top left of your project.
Click on the field and drag it to where you want to place it on your project.
To edit your field, click on it and then the “Text Tools” menu will become available.

Click on the arrow to the right of tool bar and a window will open.
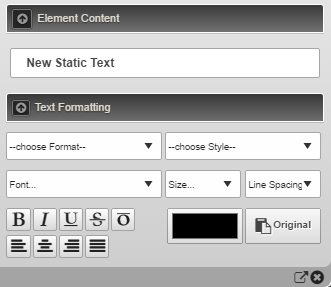
Enter your desired text in the box that says “New Static Text”
When you close the Static Text window, you will see the text update on your field. From there, you will see buttons above allowing you to adjust the alignment. This only aligns the text within the field, NOT the field on the project.
When your text field is selected, you will see an outline which you can click and drag to adjust the size. Make sure you do not design your project outside of the background image or dotted lines.
Add Text Poem
This will allow you to place a prayer/poem on your project allowing you to edit the text.
Click Insert and then Add Text Poem
Click the + sign for the prayer/poem you want to add. This will place it on your project. To edit your text refer to the Edit Your Text section above.
Click on the prayer/poem and drag it to where you want it to appear on your project.
Add Image Poem
This will allow you to place a prayer/poem on your project that has been designed by FrontRunner. You will not be able to edit the text.
Click Insert and then Add Image Poem
Click the + sign for the prayer/poem you want to add. This will place it on your project.
Click on the prayer/poem and drag it to where you want it to appear on your project.
Layering Fields
Allows you to layer fields on a project.
- Bring Forward: allows you to click an item and bring it one place forward.
- Bring to Front: allows you to click an item and bring it to the front.
- Send Backwards: allows you to click an item and bring it one place back.
- Send to Back: allows you to click an item and bring it to the back.
Example: If you have several images on your project and you are overlapping them to create a collage, you can use these buttons to bring photos forward and back, allowing you to edit them.
Locking Fields
If there are fields you want locked in a certain position, this feature will not allow you to edit the item going forward.
For example, if you have a frame with a picture and you do not want to be able to move it around, click the Frame and then the lock button.
To unlock, click the frame and then the arrow on the right side of the Elements Tool menu. Uncheck the box for “Freeze Locked Elements?”.
Aligning Fields
This function assists in aligning several items to the left or right, or to the same top or bottom.
Click and drag to select all fields you want aligned together. The buttons will become active above.

Click to select the alignment type you want to use.
Copying Fields
 The Clone button allows you to copy an item on your stationery.
Select the item and then click the Clone button. You can now select your newly copied field and move it to the desired location.
Deleting Fields
 The Delete button allows you to delete an item from your stationery. Click on the item and then click the Delete button.
Creating a Condolences Page
This only works with the Register Books and will allow you to list all condolences.
Click the Insert button and then Add Page
Use the search box and enter the word “condolence”. Two options will appear.
Click the + sign for “Online Condolences – Flow”.
Condolences will be listed and may spill onto additional pages. i.e. Page 1 may show 5 condolences and the one you would like to use may be on Page 2.
Click the arrow to the right of your Element Tools tool bar. Refer to the Reflow Tool section.
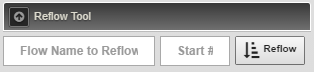
- Flow Name to Reflow = enter “condolences”
- Start = 6 (this means on page 2, start with the 6th condolence). If you had a page 3, you would enter the number you would need to start with on that page, and so on.
- Click the Reflow button.
Adjust Background Fading
This will only apply to projects with a background image.
You can lighten and darken the background image by clicking the arrow to the right of your Element Tools menu and referring to the Background Opacity section.
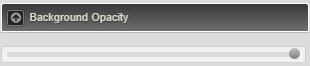
Move the circle left-to-right to adjust the background.
Need more help with this?
Don’t hesitate to contact us here.