
Follow us
Data Setup
Quickfill & System Data
Navigate to System Settings > Data Setup > Quick Fill & System Data.
The Quick Fill and System Data Maintenance is the central database for all re-occurring data entries. For new Management Systems, it is key to set up important fields such as: Funeral Directors, Embalmers, Obituary Publishers, Other Disbursements, Other Service Items, Service Type, Task List.
Each of these data entries are fields within the client record throughout Vitals, Services, Summary, and Contract sections.
Quick Fill Data
Add items to a pick list. Within a client record, the pick list will automatically be narrowed down by the matching text as it’s typed. If there is no match, the item will automatically be added to the category upon saving. These do not need to be added in setup; there is an option to add them as needed from within the record.
Static System Data Categories
These fields MUST be configured before editing/selecting within a record. Most of these fields will be drop down that will only allow you to choose an entry that is already set up in this section. As these values are not automatically added to the lists when they are entered within a record and must be maintained via this area, make sure to check each category and add values during the setup process.
** Deleting and editing the Quick Fill and Static System list values has no effect on data previously entered on forms. It only affects the values that will appear in the dropdown lists in the future. You may wish to perform periodic housekeeping and delete infrequently used values that were automatically added to the lists by the Quick Fill Auto Add feature.
Employee Maintenance
This section allows you to enter the data for each of your employees.
Navigate to System Settings > Data Setup > Employee Maintenance.
This information is used for general contact information and with the timesheets.
Click the green ‘Add New +’ button. Enter the information about the employee.
For each employee, enter the sick, vacation and holiday hours earned/available for the current year. These values will be used in conjunction with the timesheets entered to determine the remaining hours on the Employee Attendance Detail report. The values should be the hours the employee has remaining at the time the timesheet feature is first used for the current year. For example, if an employee gets 40 hours of vacation hours each year and they have already taken 8 hours as of the date the timesheet feature is first used, enter 32 hours for this employee’s available vacation hours.
Click the ‘Add’ button when done. Once added, there will be options to delete or edit.
Once a user is added, go to the Maintain Users
section and finalize the set-up.
Obituary Template
This section allows you to create your own obituary templates to speed up the obituary creation process. The templates provide starting points for an obituary that can be modified and saved for each individual.
Navigate to System Settings > Data Setup > Obituary Templates.
Click the ‘Add Template’ button. Enter a template name.
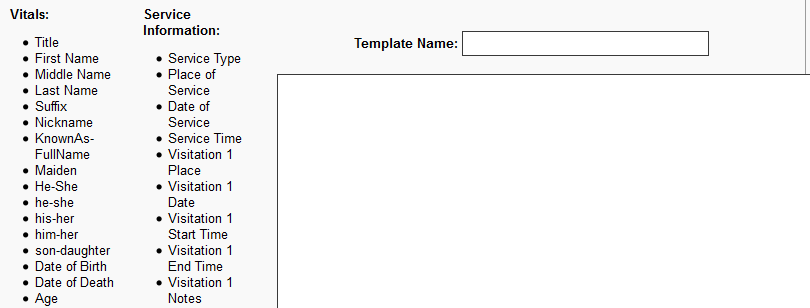
To create the obituary text body, simply enter the text you would like to appear. Wherever client information needs to appear in the body, just click on the name of the field from the lists on the left and it will automatically be placed at the current cursor position. The field name will appear with double percentage characters around the name.
** Do not remove the percentage marks since these are the characters used to determine where client information should be substituted when the client’s obituary text is auto-generated.

Click ‘Add Template’ when done. Once done, there will be options to delete or edit.
Invoice Setup
This section of the system allows you to define the text that is used with the invoice creation utility.
Navigate to System Settings > Data Setup > Invoice Setup.
Select the type of envelope used for mailing, who the invoice is signed by, and the title of that person.
Enter data for the text of each letter, which is based on the last payment date. The time periods are 0-29 days, 30-59 days, 60-89 days and more than 89 days.`
Invoice Setup
This section of the system allows you to define the horizontal and vertical printing position of each data item on the check/cheque when using this system to print the check/cheque.
Navigate to System Settings > Data Setup > Check Setup.
Enter the horizontal and vertical offsets for each items. This is necessary to account for the differences in printers and checks/cheques used. It may take some trial and error to ensure the checks/cheques print correctly.
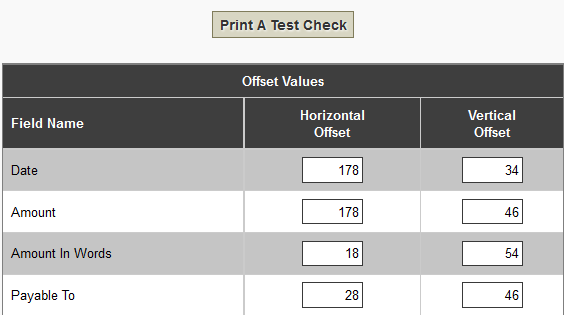
** To avoid wasting checks/cheques while setting values, it is recommended that you print test checks/cheques on a blank piece of paper and compare to an actual check over a light source until the accurate values are determined.
Click the ‘Update Values’ button when done.