
Follow us
Financials
Navigate to Arranging Director tab at the top > Financials.
Account Register
This section allows you to enter, delete, edit, print and view the details of your checks and deposits.
Adding checks and deposits are self-explanatory for the most part.
Adding Checks
- Click ‘Add a New Check’.
- Add the check/cheque number, date, amount, and the payee information.
- Click ‘Add Check’ when done.
The next check and deposit numbers available are filled in for you. You may override these values but you may not enter a duplicate number. You can change the next check or deposit number to use under System Settings > Arranging Director Admin > Set Last Check or Deposit Number Used.
If you need to Void a check: edit the check and change the Payee to Void and the amount to 0.00.
Deleting a check removes the check from the database, which allows you to reuse the check number.
Reconcile Account
When you choose to reconcile, or balance, your account you will be presented with the following image.
Select ‘Balance Account’ after you enter the appropriate data.
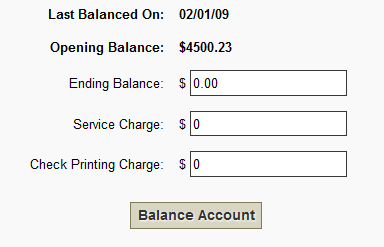
If the Opening Balance or Last Balanced On date is incorrect, you may modify it under System Settings > Arranging Director Admin > Set Account Sort Order, Last Reconciled Date and Current Balance.
Check the boxes in the “Clear” column for each transaction. The running totals will update as you select transactions.
You may edit or delete transactions and also view the full details of the transactions.
You may add new deposits and checks during your reconciliation without losing your progress. To postpone your reconciliation until a later time click the ‘Postpone’ button and your progress will be available when you return to finish your reconciliation.
Click ‘Balance Complete’ when you are done.
Account History
This section shows all uncleared transactions and any transaction less than two months old.
Any uncleared transactions, or transactions less than two months old, will appear. You will not see anything if you have neither of these. You can view the details of each transaction by clicking on ‘details’ beside each transaction.
To perform a flexible search for a particular transaction or transactions, click ‘Perform an Advanced Search’.
New fields will appear for you to perform your search. The more search criteria you enter, the better the results you will receive. Click the ‘Search Transactions’ button.
Client Invoices and Statements
This section allows you to print invoices for any outstanding payments.
Check the boxes next to the invoices you wish to print and click the ‘Print Select Invoices’ button. This will generate a PDF letter for each client, which you may print using your browser’s Print function. The list of individuals are the Buyers for each client and any additional contacts defined to receive invoices. The possible additional recipients are set up and maintained under each client’s Contact tab.
The text of the invoice letter is based on the age of the last payment on the account. You can modify your text, as well as the signature line, via System Settings > Data Setup > Invoice Setup or by clicking the” Invoice Text Maintenance” link on top of the page. After the text of the letter each invoice will include an account summary.
You may define the format of the header of the invoice letters to print the address so that it will be visible in a standard two-window envelope or for use with a plain front envelope. You define the layout setting under System Settings > Data Setup > Invoice Setup. Make your selection from the dropdown for “Type of Envelope Used for Mailing”.
** If you have trouble printing your invoices, make sure that you have the latest version of Adobe Reader installed on your computer and that you are allowing pop-ups from this site with ALL your pop-up blockers.
Trade Invoices and Statements
This section allows you to export invoices for your Trade Accounts.
- Choose your date range for the trade accounts you want to view
- Enter a payment due date
- You can also choose how many entries are showing by adjusting the number for ‘Show _ entries’
- You can use the search bar to to search for a particular account
- Check the box for the trade account you want to print an invoice for, or you can also check the ‘All’ button if you are printing them all.
- Click ‘Create Selected Trade Account Invoices’. Your selected invoices will open in a new tab.
Add Payment
This section of Arranging Director allows you to add a payment to a Trade Account.
- In the dropdown for Funeral Home Clients, choose the trade account you’d like to add a payment to.
- Choose your date range for the account and click ‘Select’.
You will see a list of records that you can add a payment to.
- Name – Decedent’s name.
- Contract/Add On – If this record has an add on, you will have a dropdown here where you can choose which one you are applying the payment to.
- Balance – The balance due.
- Payment Date – This defaults to today’s date, but it can be overridden.
- Payment Method – Choose the method of payment.
- Paid in Full – You can tick this box if you are accepting full payment.
- Amount – If you are accepting a partial payment, enter the amount here.
- Received From – Enter who the payment is from.
- Click ‘Show Payments to Add’. This will take you to a new screen that shows the payment(s) you have just filled out.
- If everything is correct, click ‘Add Payments’.
Enter P/N Interest
This section allows you to add interest to any outstanding invoices.
- Choose the appropriate Depository. (You will need to first add the depositories to the database by going to System Settings > Data Setup > Quickfill & System Data > Depositories – PreNeed.)
- Choose the date and then click Select
This will give you a list of records that are associated with that depository.
You can then add interest amounts in the dollar field, then click ‘Add Interest Amounts’.