
Follow us
Quote Builder
The FrontRunner Quote Builder is an excellent tool to attract more families to your door. Online visitors appreciate the ability to build their funeral package with select services and merchandise, and determine the total cost of their selections in real time. Visitors have the ability to customize their arrangements and make an informed decision from the comfort of their own home. Once completed, the quote can be submitted directly to your funeral home, printed as a reference, and / or saved in the system to login at a future date to make changes.
If you do not already have this activated in your system and are interested, please contact us.
Adding Products and Service Items to the Product Catalog
In order to build a quote, all products and services will need to be added to your Pulse system’s Product Catalog. Your Product Catalog is a central database for all products that could be used in several different area’s across your system, including website, showroom, contracts and Quote Builder.
- Navigate to System Settings > Catalogs > Products.
- In the middle of the screen, the categories are contained. Click on the + signs to expand and navigate through the menu.
- Make sure for each product you are adding there is a category set up.
Quote Builder GPL
- Navigate to System Settings > Catalogs > Quote Builder GPL.
- On the opening screen, there are two sections : General Price Lists and Taxes.
- Taxes: If you require taxes to show with your Quote Builder, you will need to set up applicable taxes before creating your GPL.
- General Price List
- Click the “Create New GPL” button in the upper left.
- You will be prompted to name your GPL – this is an internal name for you to track the GPL’s in the system.
- Save.
The Quote Builder GPL is made up of categories, subcategories and products/services. Each product/service must reside within a sub category which resides within a category. An example of the Category > Subcategory > Product/Service hierarchy:
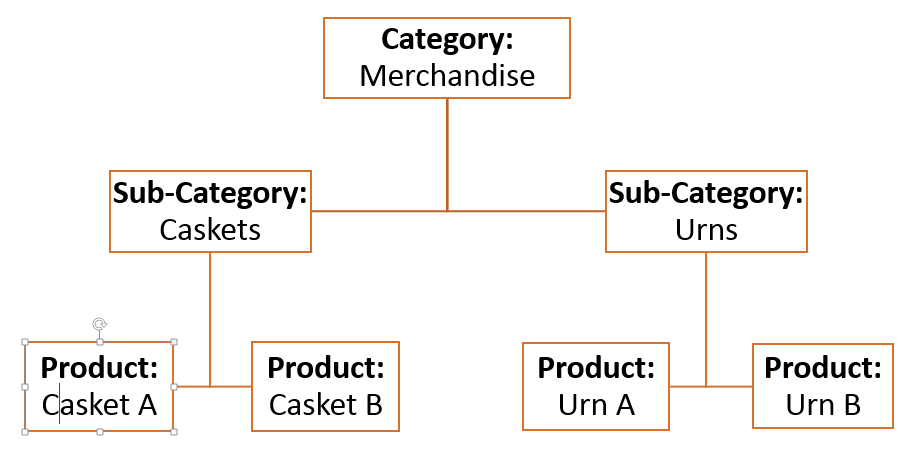
Creating Categories
- Click the “Create New Category” button.
- Give the category a name (ex. Merchandise)
- If this category as a whole should have tax(es) applied, you can add a tax by clicking the tax from the “Available Taxes” list and clicking the arrow button (or “add all” if applicable).
- If taxes are only being applied to parts of this category, you also have the ability to add them at the sub-category level.
Creating Sub-Categories
- Enter the category that you created by clicking the Configure button.
- To add sub-categories, click the Create New Sub-Category button.
- Name the Sub-Category (ex. Urns)
- Multiple Selection or Single Selection lets you select whether the user can select multiple items from this category, or only a single item
- Long Descriptions lets you provide the viewer with a description or heading for the sub-category.
- If the sub-category is to be taxed, you can add a tax by clicking the tax from the “Available Taxes” list and clicking the arrow button (or “add all” if applicable). Tax rates will add on to each other if added to a category and a sub-category. If you have already added a tax rate to a category, you do not need to add it on to the sub-category as well.
- If the sub-category is to be taxed, you can add a tax by clicking the tax from the “Available Taxes” list and clicking the arrow button (or “add all” if applicable).
Tax rates will add on to each other if added to a category and a sub-category. If you have already added a tax rate to a category, you do not need to add it on to the sub-category as well.
Quote Builder Tax Configuration
- Click “Create New Tax”.
- For tax name, provide a name for the tax (ex. Local Tax).
- For the tax rate %, enter the tax rate percentage. Enter only the number, no % sign (ex. 6.25).
- Repeat these steps for any additional taxes that you require.
If at any time you need to update the tax rate, click the pencil icon to make necessary changes. The “X” button will delete the tax rate.
Adding Products to the Quote Builder GPL
Products are added to sub-categories in the Quote Builder GPL. Whether you are adding package items, or merchandise and service items, you need to make sure all items are added to the GPL.
Adding Products
- On the Add/Remove Products Menu, you will be searching your product catalog listing for products to add to the Quote Builder GPL. From the Available Products tab, use the drop-down menus to search your product catalog:
- Select a Classification (use the dropdown to choose a class (ex. merchandise)
- Select a Category: Once a classification is chosen, the corresponding categories will appear in the drop down (ex. Urns)
- Select a sub-category, or select All to view all items within the category.
- All products that have not currently been selected for this GPL will become visible and show you the product code, product name, retail price, description and available actions. You can search for products to add by using the search bar in the upper right or sort products by clicking on the headings.
Selecting a Single Item
Select the green Add + button to add products to the GPL. This will bring up the product menu.
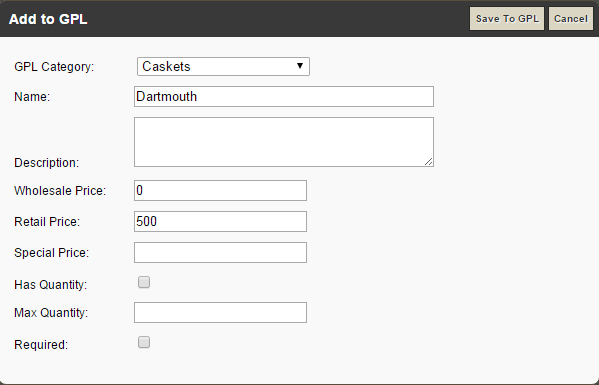
A popup will appear where you can enter all that apply. Note, if you are doing packages then disregard all fields and click Save to GPL.
- GPL Category (*): shows you the category of the Quote Builder GPL that you are adding the product to.
- Name (*): The name of the product/service from your product catalog will pre-populate here. You can change the name if you need to do so, however this change will only be reflected in the Quote Builder and does not write back to the Product Catalog.
- Short Description: The description that will appear in a “more info” bubble beside the product/service listing on the website. An example of how a description will appear on the website is shown in red. !(center)https://manula.r.sizr.io/large/user/2510/img/product-short-description.png!f
- Wholesale Price: Will populate from the product catalog, but will not show to the public
- Retail Price (*): Will populate form the product catalog and will show to the public. You can change the price if you need to do so, however this change will only be reflected in the Quote Builder and does not write back to the Product Catalog.
- Special Price: Allows you to denote a special, or sale price for your item
- Has Quantity: If a product or service is available to be purchased in multiples (ex. Keepsake Urns, or Death Certificates), check the “has quantity” box. You will then need to fill out the next box, Max Quantity, to complete the set-up.
- Max Quantity: If you have selected that a product “has quantity”, you will also need to denote the available quantity. Type the available number of selections into this box in numerical format. For example, if someone could purchase up to 10 keepsake urns, you would type “10” into the box. On the website, this will appear as a quantity drop-down that the viewer can select the number of an item to be added to their quote.
- Required: If an item is a required item or service for an arrangement that a client must select to build a quote, this will activate the item as a selected item and the client will be unable to uncheck the item.
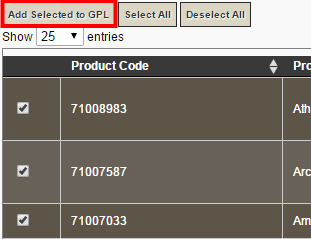
If you have multiple items to add to the same sub-category and you will not need to make any changes to the category, name, description or price, you can upload multiple items at a time by clicking the checkbox on the far left for each included item, then selecting “Add Selected to GPL” (shown in red)
For the group of selected products, you can then enter information for:
- Has Quantity: If a product or service is available to be purchased in multiples (ex. Keepsake Urns, or Death Certificates), check the “has quantity” box. You will then need to fill out the next box, Max Quantity, to complete the set-up.
- Max Quantity: If you have selected that a product “has quantity”, you will also need to denote the available quantity. Type the available number of selections into this box in numerical format. For example, if someone could purchase up to 10 keepsake urns, you would type “10” into the box. On the website, this will appear as a quantity drop-down that the viewer can select the number of an item to be added to their quote.
- Required: If an item is a required item or service for an arrangement that a client must select to build a quote, this will activate the item as a selected item and the client will be unable to uncheck the item.
- Once you have completed the product listing, click “Save to GPL” in the upper right.
Back to Other Sub-Categories
Click the “back” button in the upper left of the screen.
If you are adding packages, click the Back button again and proceed to the Configuring Packages section below.
Otherwise, select the new sub-category to add products/service items to and repeat the steps above.
Reviewing Items in your GPL
- Click the tab for GPL from the top of the page.
- Every product that has been added to this particular GPL will be listed on this page. There are 2 options provided for each listed product:
- Edit : Click on this option for a pop-up to appear to change the category, name, description, price, quantity and requirements for this product. Save
- Remove : This option removes the product from this Quote Builder GPL, but not the product database.
The Quote Builder Module also has the ability to showcase packages that your firm may offer. Click Here to visit the Quote Builder Package Set-Up
Configure Packages
- Before you create a package, you need to add your items to the GPL first.
- You need to be on the Configure screen. Either use the back button (yellow) or the Configure icon to get there.
- Click Create New Sub-category.
- Create a name for your package.
- Click Add Products.
- Use the drop downs to select the classification then category then sub-category.
- Click Add Products beside the items to add to your package.
- Click your back button (yellow) to get to the GPL Lists screen.
- Select Configure Packages.
- Select Create New Package.
- Give the package a name, description and price. Special Price is used when you want to temporarily modify a price.
- Click Save.
- Now you can begin to add products. Click Add Products.
- The listing will show all products available to select from your GPL to be added in to the package. Only products and services that have been added to your Quote Builder GPL will be available to select from packages.
- To add an item to a package, select the green “Add to Package +” button. As you add products to the package, they will populate to the item list at the top of the page.
Note: Packages do not have taxes applied. If you are wanting to include taxes in your package, the price for the package will need to be inclusive of the taxes. We recommend making a note in the package description as to whether or not applicable taxes are included in the price.
If you need to add more packages, click the Back to Package Configuration button and follow the same steps.
Activating Your Quote Builder For the Website
Setting up the Activation Process
Once your Quote Builder GPL set-up is created to include all packages, products, services and prices, it must be activated on the website in order to be seen by online visitors.
- From the left menu, click Quote Builder GPL > click Configure for the GPL you need to activate.
- Where you see Status, click the pencil icon and change to Active.
- To save, click the disc.
You can also do this step from the GPL list by clicking the green Make Active + button.
Setting up Your Quote Builder on the Website
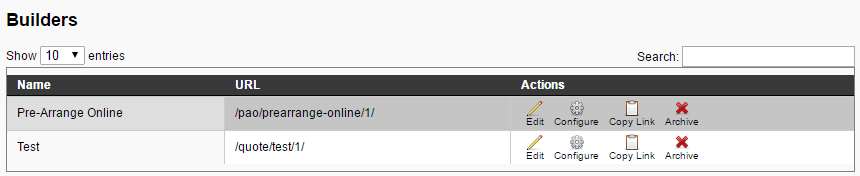
- From the left menu, click Website Tools > Quote Builders.
- Builder Name : Each GPL in the system should have it’s own unique name to identify it (Ex. ABC Funeral Home Quote Builder)
- Builder URL: create a url for this (ex. quote-builder).
- GPL: Select the GPL that you would like to use for this Quote Builder from the drop-down list.
- Check the box for Long Family Form if you want the online visitor to enter all vitals, etc....
- Click Create Builder. This will create the Quote Builder in the listing below.
Configuring the Quote Builder
- For the Quote Builder that you just set up, click the Configure button.
- This will lead you to the builder configuration screen, which allows you to build the way that your Quote Builder will appear on the website.
- If you have packages:
- Click the Add a Package button. All of the packages that you had loaded on your GPL will appear.
- Click on the package to add it to the Quote Builder Website Configuration.
- Continue to add until all of your packages are added.
- To add other services and merchandise:
- Click the Add a New Category button. Each category that you have built into the GPL will be available from the list here.
- If you created packages and they are showing here, you can delete by clicking the 'x'.
- When you select a category, you will receive a prompt asking if you would like to add all of the sub-categories and items for this category. If you would like to pre-fill the category with all of the information from the GPL that exists in this category, select yes. If you select no, you can manually add each item in.
- Continue to add until all of your services and merchandise are added.
Organizing Your Quote Builder
You also have the ability to organize the appearance of your quote builder. You can mouse over the listed packages, categories or sub-categories to delete (with the red X) or reorder (with the blue arrows).
Disclaimer
If you need to add a disclaimer to your quote builder (ex. Prices subject to change without notice, Applicable taxes not included, etc...) click the Edit Disclaimer button at the top.
Here you can enter and save any disclaimer verbiage that you require. The disclaimer will be visible to the viewer at the top of the quote builder.
Editing Options for Your Quote Builder
Click Back to Builder List button.
There are a few editing options for your quote builder. Click the Edit button beside your quote builder.
- User Logins – you can remove the option to have a login created when someone builds a quote for themselves. However if this is disabled then there will be no shopping basket for PayPal.
- Long Family Form – uncheck the box if you do not want the longer family form.
- Builder Section – you can decide which sections you want to show/hide.
If you make any changes, don’t forget to hit Save.
Adding Your Quote Builder to Your Website
You will need to contact your success coach
to finalize the setup for you.
Submitted Quotes
When an online visitor submits a quote through the Quote Builder, a copy will be accessible for your funeral firm to access.
Use the Search field to locate a particular quote.
- Client Name – The name of the person that the quote is intended.
- Creator – This field includes the name of the person who submitted the quote.
- Builder Name – The quote builder used to submit the quote.
- Sub-Total – The pre-tax total of quote.
- Taxes – All taxes that apply.
- Quote Total.
- Actions – Your firm can preview and/or download copy of the quote.
As soon as you approve a quote in your system for At Need or Pre Need contracts, the system auto-generates a contract number.
Collect Payments from Quotes Submitted
Once your quote builder is setup, you have the ability to setup payments so you collect the money once a quote has been submitted.
Payment Processing Options:
- PayPal
- Navigate to System Settings > Website Tools > Quote Builder.
- Click Configure for the quote builder you setup.
- Click the Edit PayPal Configuration button.
- Enter in your username, password, and signature key.
- Click Save.
- Authorize.net
We need to set this up for you. Provide us with your API Login ID and Transaction Key.