
Follow us
Stationery Printing
FrontRunner has now launched a new and improved stationery line called Print on Demand. This stationery line features new themes to match Online Memorial Tribute designs for a full cohesive Book of Memories brand. With that said, you do have the ability to choose different stationery pieces in different designs.

If you do not already have this activated in your system and are interested, please contact us.
Getting Started: Create New Project
- Log into your system > open a record > click Print On Demand.
- Click Add Stationery to Project.Print On Demand - FrontRunner's Blank StationeryHybrid Stationery - FrontRunner's Pre-Printed Stationery
Pierce Window Book Line
Pierce Premium Line
Pierce Standard Line - Select a product.
- Select a theme.
Editing Your Project
Below is some information about some of the features within your project.
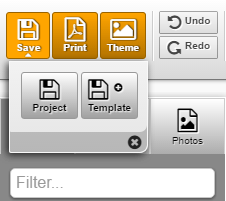
- The orange buttons in the top left of the project indicate your options for saving your project.
- When you click Save in the top left, there will be two buttons that will appear below.
- The Project button will save your project to the current record you are working in.
- The Template save option will create a template for use in other records. This is useful if you build a stationery item that is customized for your firm, that you'd like to have for use again for other clients etc. For more information on setting up custom templates, see below.
- The Print button will save your stationery project as a PDF document and download it to your computer. You can then print a hard copy. More information on printing and printer settings is found below.
- The Theme button will allow you to change the background design theme of your project.
- Any edits you make, you have the option to undo or redo an action.
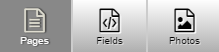
- There are 3 tabs to the left:
- Pages: will display all pages for the project you are working on. Some only include the one page. If you see more than one, you can click on the others to view/edit.
- Fields: allows you to add fields onto your stationery that pull the data from the record. To learn more, refer to the Adding Text Fields section below.
- Photos: will display all the photos from the record's photo library.
Editing Text
For any text fields that are already on the template, you can simply double click to edit the text and type in your new text or edits.
If making changes to text that had information pulled from a record, the changes will not write back to the system. If you need the information to update within the record as well, make the changes in the record, then refresh the stationery and the new information will populate.
Adding Text Fields
There are two options for adding text fields:
- Add a field to pre-populate the data from the record.
- Click the Fields button to the left.
- By default the filter is set to "most common" fields. Use the drop down and/or search box to narrow down your results. Adjust the filter to "all" if you are unable to find the field.
- Once you have found the field you want to add, click on it and drag it to your stationery project. Make sure to place it where you want it to appear on the stationery.
- Once it is on the stationery, it will automatically change the name of the field to the data from the record.
- You will see buttons above allowing you to adjust the alignment. This only aligns the text within the field, NOT the field on the project.
- When your field is clicked on, you will see little boxes along the outline of your field. You can click these to make your field larger or smaller. Make sure you do not go outside of the background image or dotted lines.
- Add your own text field, which would not pull from the record. This can be either data you manually enter or a poem.
- This is used if you want to add your own custom text.
- Click Insert and then Add Text
- A new text field will appear at the top left of your project.
- Click on the field and drag it to where you want to place it on your project.
- To edit your field, click on it and then the “Text Tools” menu will become available.
- Click on the arrow to the right of tool bar and a window will open.
- Enter your desired text in the box that says “New Static Text”
- When you close the Static Text window, you will see the text update on your field. From there, you will see buttons above allowing you to adjust the alignment. This only aligns the text within the field, NOT the field on the project.
- When your text field is selected, you will see an outline which you can click and drag to adjust the size. Make sure you do not design your project outside of the background image or dotted lines.
Adding Pages (for Register Books only)
- Click Insert > click the Page button.
- Select a page you want to add to your project, by clicking the + sign.
- It will then open that page on your project in which you can edit if needed.
Any page you add, by default, will be at the end of your project. To move it, refer to the Pages section found on left. Scroll to the bottom of your pages. Click on the page and drag it up to where you want it.
To add pages that print the online condolences into the register book, visit our advanced section below.
Adding Photos
Photos can be added to stationery items in two ways:
- Some stationery items have 'frames' added onto the stationery already, which act as a placeholder for a photo. In this case, you simply need to click the frame on the stationery piece which will bring up the photos associated to the record on the left. Click the photo you'd like added to the frame and it will appear on the stationery.
- Using the menu on the left, select photos and click and drag a photo onto your stationery item. By default, the photo will be a rectangle with a transparent frame, however this can be adjusted.
If you need to upload a photo that is not already available on the record, you can upload it from within the print software:
- Click Insert > click the Photos button.
- Select Add files, locate the image on your computer, click Open, and Start Upload. Once uploaded, it will be available within the Photos section on the left.
- There is a drop down available at the top of this section which will either show all photos from within the record or your company logo.
Adjusting Photos
- To zoom the photo in or out click on the photo and use the wheel on your mouse to scroll up or down.
- If you wish to move the photo around within the frame to adjust the focal point of the photo, click the red dot (in center of frame) and drag the photo where you want to place it.
- To make the photo larger, click on the photo then drag the corner boxes out.
- To change or add a frame surrounding the photo, click the photo. From the Image Tools menu that appears, select Change Frame. Choose a frame then save.
- Note: For advanced users, when you click on the photo an Image Tools popup will appear. You can reference the Image Positions section and adjust the numbers.
NOTE: When editing a project that has dotted lines around the edges, make sure you never go outside the dotted lines. Only data within the dotted lines will print.
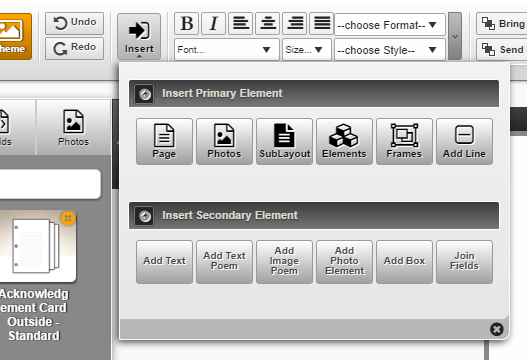
Adding Elements
The Elements feature allows you to add things like pre-designed graphics, arrows, dividers etc.
- Click Insert > Elements
- Click the + sign for the element you want to add. This will place it on your project.
- Click on the element and drag it to where you want it to appear on your project.
Adding/Removing Lines
This will allow you to place a horizontal line on your page. This would be used if you are looking to print so text can be written above the line, or to be placed on the stationery item as a visual divider.
- Click Insert > Add Line
- This will insert the line on your project. When your line is clicked on, you can adjust the length by dragging the field boxes out.
- If you want to remove the lines, click the Dotted Square button.
Join Fields Basic: https://recordit.co/ta92mAeaDw
Join Fields Date Formatting: https://recordit.co/d3GGzKbjii
Joining Fields Together
Joining fields together is helpful when you're looking to add multiple fields onto a single line of stationery. This allows the fields to behave as one and saves time in trying to line the fields up to look as though they're on one line.
Some examples of commonly joined fields are:
Some examples of commonly joined fields are:
- First Name + Last Name
- First Name + Middle Name + Last Name
- Date of Birth + Date of Death
2. Find the individual fields you wish to combine. If they are not in the Most Common category, click the dropdown and select another category, or "All" and use the search bar.
3. Click and drag your individual fields onto the project page.
4. Once on the project page, select one of the fields, then hold the Shift key (on your keyboard) and select the other field. They should be outlined in blue to show they are selected.
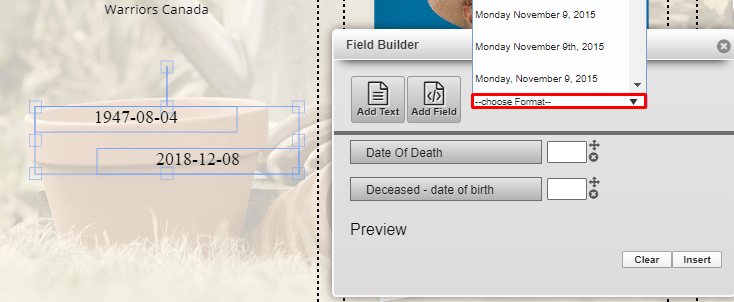
5. From the top menu, click the Insert Button > Join Fields
6. The Field Builder will appear on the right, listing your 2 fields.
7. Add any text you wish to appear between the fields in the white box beside the first field.
For example, if you wanted the joined field to read "Date of Birth - Date of Death", you would need to type space, dash, space into the box. If you wanted the joined field to read "John Doe" (first name, space, last name), you would type a single space into the box.
8. If you need to apply any formatting to the individual fields (ex. setting the format that the date shows), click each field individually and use the drop down for format to adjust the formatting. You will need to do this for each field of the joined fields within the menu that you want to customize the formatting on.
9. Click Insert at the bottom right of the Field Builder.
10. Your joined fields with the added text will appear at the top left of your project.
11. You should still have your 2 original fields selected - click the Delete button at the top right, as the old fields are no longer needed.
12. Move your newly added joined fields into position on your project, and adjust the width of the box, text formatting, etc. as needed.
Add Text Poem
This will allow you to place a prayer/poem on your project allowing you to edit the text.
- Click Insert and then Add Text Poem
- Click the + sign for the prayer/poem you want to add. This will place it on your project. To edit your text refer to the Edit Your Text section above.
- Click on the prayer/poem and drag it to where you want it to appear on your project.
Add Image Poem
This will allow you to place a prayer/poem on your project. You will not be able to edit the text.
- Click Insert and then Add Image Poem
- Click the + sign for the prayer/poem you want to add. This will place it on your project.
- Click on the prayer/poem and drag it to where you want it to appear on your project.
These poems behave the same as photos/images in that they can be zoomed in/out by scrolling the mouse wheel.
If you have a prayer/poem you want us to add into this library, please let contact us.
Copying Fields
The Clone button allows you to copy an item on your stationery. Select the item and then click the Clone button. You can now select your newly copied field and move it to the desired location.
Deleting Fields
The Delete button allows you to delete an item from your stationery. Click on the item and then click the Delete button.
Printing and Printer Setup
When you print an item from FrontRunner's Print on Demand program, the stationery item will download to your computer as a PDF file. This allows you the option to review the stationery before printing. gives you the ability to send it to the family to review before printing, and, because PDF's are a universally accepted file format, means that if you have issues with your printer in-house the files can easily be taken to a print shop for printing.
We recommend using Adobe Acrobat Reader for printing PDF's. This free program is pre-installed on most computers, and free to install if your computer does not have it.
Printing your PDF Files
- Open the PDF using Adobe Acrobat Reader. If your document isn't opening in Adobe Acrobat Reader, see below.
- Click Print.
- There are three pieces of information to review in the Print Dialog menu before clicking print:
- From the Paper Size and Handling section, ensure Actual Size is selected. This ensures that your document will print to the proper specifications that the template has been set up for.
- From the Orientation section, ensure that Auto Portrait/Landscape is selected.
- From the right hand side of the print dialog box, above the document preview, ensure that the Document Size and the Page Size match. If these two items do not match you may need to select the document or paper size, or you may need to set up a custom paper size.
Please note:
Some browsers like Google Chrome are set up to open PDF's within the browser using the browser's own PDF viewer. We do not recommend using this option
for printing stationery as it can often cause issues when printing because it is an extremely simplified PDF program. Ensure that you are using Adobe Acrobat Reader for best printing practices.
To turn off the PDF Viewer in Google Chrome:
- Click the three dots in the upper right of your browser window (just below the "x").
- Click Settings.
- Scroll to the bottom and click Advanced.
- Scroll to the bottom of the first section (Privacy and Security) and click Content Settings.
- Click PDF Documents.
- Activate the toggle to Download PDF Files.
Setting Up Custom Page Sizes
Depending which stationery pieces you are printing, you may need to set up your computer and printer to recognize a custom paper size.
Stationery items that may require a custom paper size include:
Stationery items that may require a custom paper size include:
- Acknowledgement Cards - 7" x 10"
- Window Inserts - 6.75" x 8.75"
- Pre-printed Standard Register Book Pages - 6.75" x 9.5"
- Window Book Pages - 7" x 11"
- Pierce Premium Line Register Book Pages - 7" x 11"
- Pierce Standard Register Book Pages - 6.75" x 9.5"
Having trouble printing? Check out our FAQ's below for more printing help.
Saving Custom Templates
Creating and saving a custom template allows you to make edits to the default template and save a version for your firm to use on any record/case. This is helpful if you want to set up template versions that offer various options (ex. for families wanting no photo); if you want to change the text, font, color etc.; if you want to have your logo on stationery items that you print; or if you want to set up different layouts than what is offered in the default templates.
- Make any adjustments necessary to the default template.
- Save > Project
- Save > Template
- A pop up will appear for you to name the template - you'll want to name it something that makes it clear what the template is, especially if you plan to create multiple template versions (ex. Prayer Cards - No Photo, Prayer Cards - With Logo)
- Click Save Default Layout
NOTE:
Be sure to use fields from the system without any manual edits. System fields that populate data from the record (including photos) will pull the related data for any deceased record, whereas manually typed information will save to your template exactly as typed.
If you are setting up a custom template for your logo to populate to, please Contact Us so that we can set up your logo properly in the system for you first.
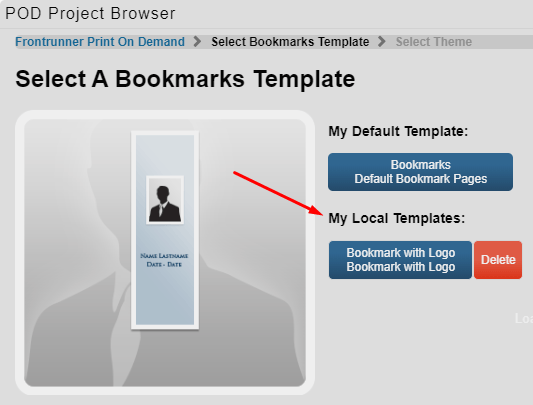
To Open a Custom Template
Once you have created custom templates, when you open a stationery item you will be presented with a screen where you can choose to open the default layout, or your custom templates. Custom templates are found under the "My Local Templates" list.
Videos
Stationery Training Video 1: Adding a Record
Stationery Training Video 2: Creating & Editing Your Stationery
Stationery Training Video 3: Personalizing Your Stationery
The below sections are for advanced stationery users
Layering Fields
Allows you to layer fields on a project. Example: If you have several images on your project and you are overlapping them to create a collage, you can use these buttons to bring photos forward and back, allowing you to edit them.
- Bring Forward: allows you to click an item and bring it one place forward.
- Bring to Front: allows you to click an item and bring it to the front.
- Send Backwards: allows you to click an item and bring it one place back.
- Send to Back: allows you to click an item and bring it to the back.
Locking Fields
If there are fields you want locked in a certain position, this feature will not allow you to edit the item going forward. For example, if you have a frame with a picture and you do not want to be able to move it around, click the Frame and then the lock button.
To unlock, click the frame and then the arrow on the right side of the Elements Tool menu. Uncheck the box for “Freeze Locked Elements?”.
Join Fields Basic: https://recordit.co/ta92mAeaDw
Join Fields Date Formatting: https://recordit.co/d3GGzKbjii
Removing Lines from Register Book Pages
Many register book pages contain lines for the fillable text to sit on. By default, these lines are 'locked' to the page, so that it's easy to move and adjust the text on them without worrying about moving the line as well.
If you prefer not to have the lines at all, there is an option to turn them off. This will need to be done on each page that has lines.
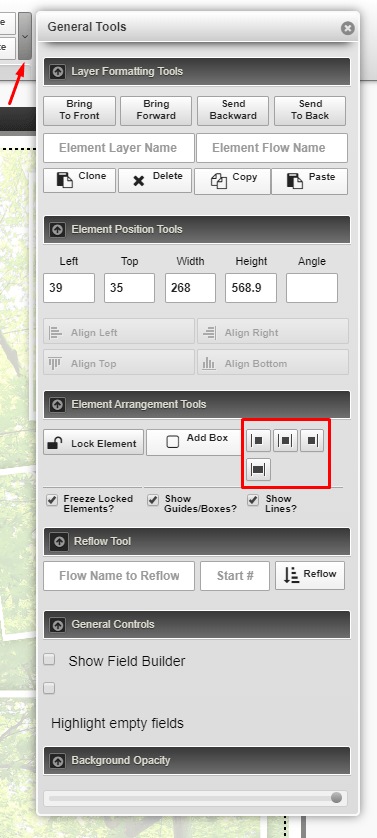
- From the top menu Element Tools, click the small arrow at the far right. \
- From the Element Arrangement Tools section, uncheck the box "Show Lines?"
- Repeat for each page that contains lines.
If you are adjusting the layout or removing fields on a page, you may wish to remove or move the existing lines in the template.
- From the top menu Element Tools, click the small arrow at the far right.
- From the Element Arrangement Tools section, uncheck the box "Freeze Locked Elements?". This will unlock the lines and allow you to move or remove them.
- Click on the line that you need to adjust - you can move it by clicking and dragging, or can remove it by clicking the delete button in the top menu
- Once all adjustments have been made, re-lock the lines by re-checking the "Freeze Locked Elements?" box.
Aligning Fields
This function assists in aligning several items to the left or right, or to the same top or bottom.
- Click and drag to select all fields you want aligned together. The buttons will become active above.
- Click to select the alignment type you want to use.
To align fields to the center, the stationery item must have a bounding box (dashed line going around the edges of the stationery).
- Select the field you want aligned (only one field can be selected).
- From the top menu, from the far right of the Element Tools, click the small down arrow button to open the full toolbar menu.
- From the Element Arrangement Tools section, click the center alignment button. This will align your field within the center of the bounding box.
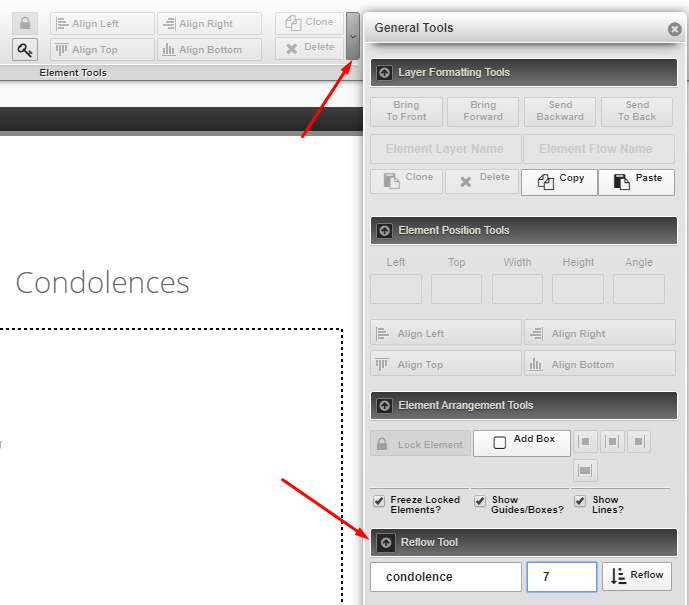
Creating a Condolences Page integrating Book of Memories Condolences - for Register Books only
1. From the top menu, click the Insert > Add Page
2. Use the search box and enter the word “condolence”. Two options will appear.
3. Click the + sign for “Condolence Page – Reflow”.
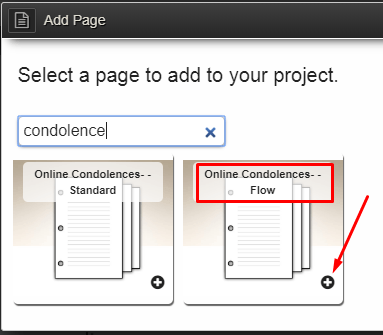
4. One Condolence Page will pull as many messages as will fit on one page (typically 4 or 5, depending on the lengths of condolences left).
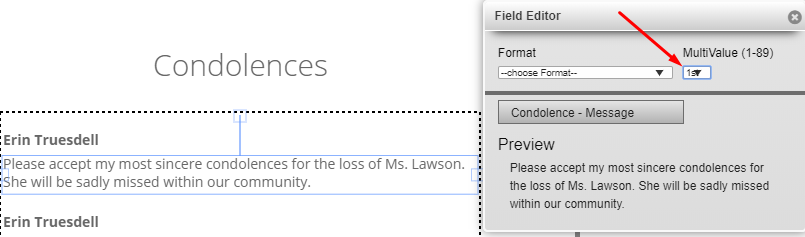
5. Make note of the number of the last condolence left on the page as you will need this to set up the next page. You can view this by clicking the last condolence on the page and it is shown in the Field Editor window that will appear.
6. To show the next set of condolence messages, add another Condolence Page - Reflow (following steps 1-3).
7. Open the Element Tools expanded menu (skinny gray arrow at the top right, beside the delete button). Look for the Reflow Tool section.
8. In the Reflow Name box, type in “condolence” (all lowercase)
9. In the Start box, type in the number of the next condolence message that you want to appear on the page (Example, if your last page ended with condolence 6, type "7" - meaning, on this page, start with the 7th condolence).
10. Click the Reflow button. The condolences on the page will reconfigure to showcase the next batch of condolences.
11. Continue steps 5 - 10 as many times as needed to reach the end of the condolence messages.
Adjust Background Fading
- This will only apply to projects with a background image.
- You can lighten and darken the background image by clicking the arrow to the right of your Element Tools menu and referring to the Background Opacity section.
- Move the circle left-to-right to adjust the background.