
Follow us
Quickbooks
FrontRunner offers Quickbooks integration connections with Quickbooks Online
and Quickbooks Desktop
version 2016 or higher.
If you are using the full Pulse management system and do not already have this activated in your system and are interested, please contact us.
Overview
** We are here to help you with any questions about the integration but we are not Quickbooks support. If you have a Quickbooks question, you will need to talk to your accountant or look in Google.
Setting Up the Integration for QBO and QB Desktop
Before you are able to use the QuickBooks Export feature, you must first integrate your QuickBooks account with the FRP system and set up the link configuration.
Click the Get Started Now
button and follow the steps.
Using the Quickbooks Integration
Based on your configuration set up, you may have set At-Need Contracts to “Update Quickbooks on Save” automatically. This means that new contracts will automatically be flagged to push to QB when saved.
If this was not enabled, you will have the opportunity to check off the "Update Quickbooks on Save" when ready.
If this was not enabled, you will have the opportunity to check off the "Update Quickbooks on Save" when ready.
In order to push (or re-push) a contract over to QB, the "Update Quickbooks on Save" must be checked on. Then you will hit the save button.
If you are not wanting the contract to push to QB make sure the "Update Quickbooks on Save" is not checked.
If you are not wanting the contract to push to QB make sure the "Update Quickbooks on Save" is not checked.
Should wish to change your default contract push settings, for At-Need and/or Pre-Need Contracts, please visit the Miscellaneous Configuration Step in your Configuration Wizard.
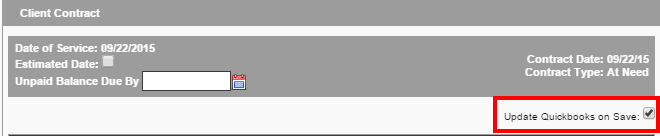
This checkbox also controls whether future amendments to this account (changes to the contract, payments etc) will push to QuickBooks or not. If you need to de-activate the integration for a particular contract after the invoice has already been pushed through to Quickbooks (for example, if you had to manually adjust something in Quickbooks), you can disable this box at any time to turn off the integration for this client.
QB Online:
Once an item have been saved with "Update Quickbooks on Save" the invoice will automatically be pushing over to QBO.
You will receive a pop up message to say it was Successful. If you receive an error, view the View Log to confirm the error in detail. This will mean the invoice did not push.
QB Desktop: Running the Web Connector
Once there is an item, or several items, saved from the FRP system, those items will sit on the WC.
- You will need to open your WC to officially push the information to QB.
- Click Update Selected.
If you wish to change how the WC is run, visit the Web Connector Setup
page.
Making an Entry on the Account
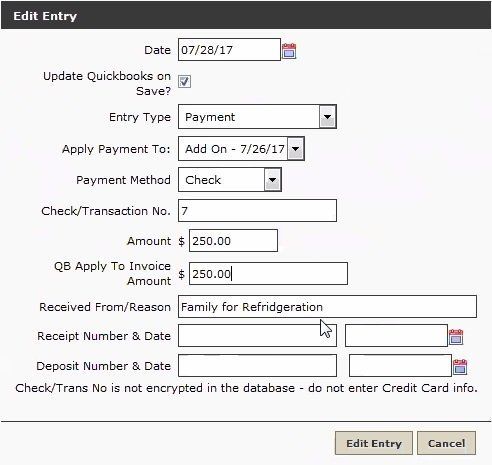
When making an entry towards the account in your FrontRunner system, the entry screen will have additional options just for your Quickbooks connection.
Each time an entry is made towards a contract, whether it be a Payment, Down Payment, Late Fee, Additional Discount, or a Refund to Family, it too will be defaulted to “Update Quickbooks on Save” IF the Contract is already flagged as "Update Quickbooks on Save".
If using QB Desktop, the entry will be queued to push to Quickbooks until the Web Connector runs.
If using QBO, the entry will automatically push over to Quickbooks.
Should you wish to disable the entry from being updated to Quickbooks, you may disable the “Update Quickbooks on Save” prior to saving.
Entry Types
Payment & Down Payment Entries
These entries will be pushed as undeposited payment entries in Quickbooks. By default these entries will be applied to the Customer and not the Invoice. If you want to ensure money is connected and paid to the invoice, fill out the protion to be applied in the "QB Apply to Invoice Amount" before saving.
Adjustment & Late Fee Entries
These entries will push as line items on your Quickbooks invoice. You may establish which item in Quickbooks it links to under the Configuration Wizard Step 3b. Contract Line Configuration.
Refund to Family Entries
These entries will push over as an un-written Check in Quickbooks. In order for these to successfully push over, you will need to configure the bank account in which these will be connected to. You may establish this in the Configuration Wizard Step 3b Contract Line Configuration.
‘Amount’ and ‘QB Apply to Invoice Amount’
When making an entry it is important to remember that although in FrontRunner you can make entries greater than the Contract Amount, Quickbooks does not allow an Invoice to receive payments great than it.
Therefore your entry screen will give you the flexibility to apply a certain portion to the Invoice (if needed) and the remaining balance will just get added to the Account. As a default the amount you enter to the ‘Amount’ field will also pre-populate to the ‘QB Apply to Invoice Amount’. Only in the situations when you cannot apply the full amount to the Invoice you can adjust.
This will allow payments larger than the Contract Amount or Amount Due to be entered into FrontRunner and successfully push over to Quickbooks.
Once the entry is saved, your entry is document on the Accounts tab and will indicate whether or not the "Update Quickbooks on Save" was flagged. The QB: Y | N status does not mean that it has successfully pushed over.

Quickbooks Sequence:
The Quickbooks integration works in a sequence that can often help you determine the cause of an error. The following is the order that item(s) are queued to Quickbooks:
- Customer Add
- Customer Modify OR Invoice Add
- Invoice Modify or Payment Add
- Payment Modify
Quickbooks Log
The Quickbooks Log, found under System Settings > Arranging Director Admin > View Logs, will show you all transactions and information that have been saved on the FRP side.
If using the QB Desktop
and Web Connector the View Log will showcase any transactions that are Queued to the WebConnector. To officially push the items to QB you will need to run the WebConnector.
If using the QBO
version, all transactions are automatically pushed to QBO so nothing will show Queued.
The View Log will detail all transactions, dates and statuses.
** It is highly recommended you view this if not everyday, every other day until you are comfortable with the integration.
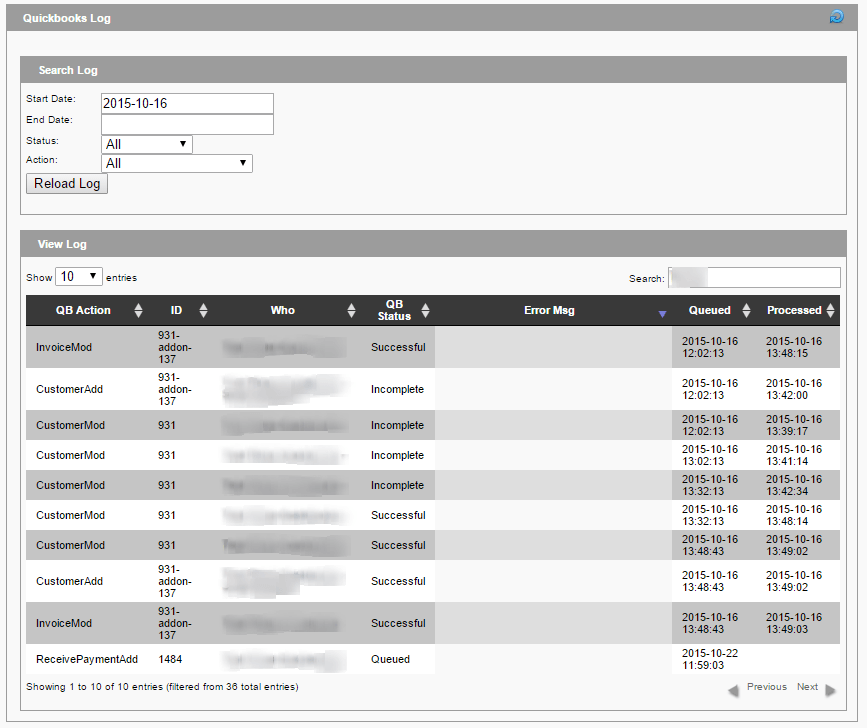
- QB Action = Action being made from FrontRunner.
- CustomerAdd = New Customer (deceased) Added
- CustomerMod = Previous Customer (deceased) Modifications
- InvoiceAdd = New Invoice/Contract Added
- InvoiceMod = Previous Invoice Added being Modified
- ReceivedPaymentAdd = New Payment Added
- ReceivedPaymentMod = Previous Payment Add being Modified
- ID = Unique ID code per Customer (deceased)
- ID may also include if the particular QB Action is being made towards a Contract Add-On.
- Who = Customer (Deceased) or Sub Customer (Buyer) Name
- QB Status = Real time status of QB Action
- Queued
- Successful
- Error
- Error Msg = Description of QB Action if QB Status received error. View Error Message Codes for more information.
- Queued = Time stamp QB Action was originally queued from FrontRunner
- Processed = Time stamp the QB Action’s was updated from Web Connector
Troubleshooting
Quickbooks Setup and Maintenance
Navigate to System Settings > Arranging Director Admin > Financial & Quickbooks Setup and Maintenance
Quickbooks Export
This section allows you to export transactions to Quickbooks.
Navigate to Arranging Director > Financials > Quickbooks Export
The QuickBooks Export will show all transactions that have not been previously exported.
- Click the PDF icon in the upper right of the screen to show the list before the export is generated.
- Click “Export these Transactions” to export a QuickBooks IIF file. The IIF file will be delivered via email.
A few notes about IIF files:
- QuickBooks does not allow the import of voided checks via the IIF method. If you have a voided check, you will have an additional file mailed with the export information which contains the list of voided checks. These will need to be manually added into Quickbooks
- QuickBooks IIF only allows the import of one split line for deposits