
Step 3b: Contract Line Configuration
Step 1: Locate the appropriate item and account information from your QuickBooks company file.
- Click on the ‘Update Account Query’ button to provide Pulse access to your list of configured QuickBooks Accounts.
- Wait for automatic update (default setting of 10 minutes) or Click Update in Web Connector
- Once the Web Connector communication is finished, click the blue swirl icon at top right to return to the Configuration Wizard and then return to the Contract Line Configuration page.
- You should now see your QuickBooks Items and QuickBooks Income Accounts in the ‘QuickBooks Items’ and ‘QuickBooks Income Accounts’ sections respectively.
- If you have Items and Accounts set up in QuickBooks but you do not see them in Pulse, an error has occurred. Check the Quickbooks log and retry the steps above. If you still do not see the information, contact your FrontRunner Success Coach.
Configure Confirmation
Once you have configured your contract line items appropriately, confirm by checking the box that the configurations are correct and complete.This will be the last step that you do for Step 3B, once the line items are paired.
Configure Additional Line Items
For any additional ‘on-the-fly’ line items that are added to a contract, select which Quickbooks account you would like them to link with.
Configure Discounts
For any discount line item that is added to a contract, select which Quickbooks account you would like to link it with. If you have multiple Discount line items in FrontRunner, you may link each of them up to a different item within Quickbooks.
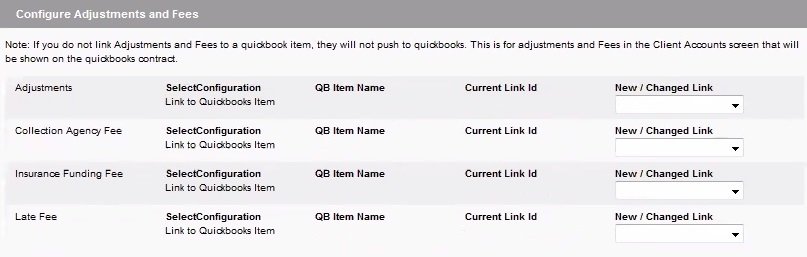
Configure Adjustments and Late Fees
The section will allow you to set up where Adjustments and Late Fees get linked to in Quickbooks.
Configure Refunds
This section will allow you to set up where “Refund to Family” payment entries from the Account tab will connect to in Quickbooks. These items push over as Credits to Quickbooks.

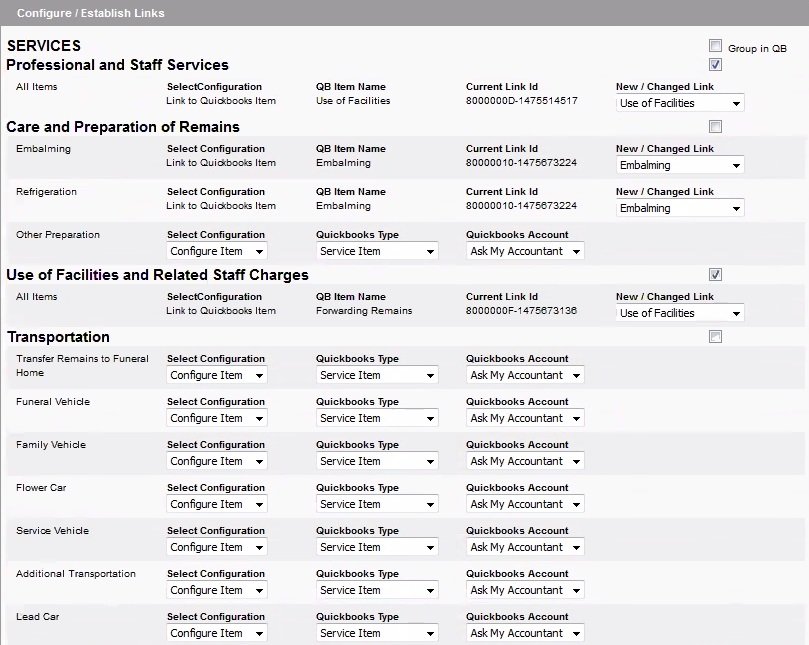
Configure / Establish Links
This section lists each non-product line item in your Arranging Director contract. The configured/relevant services will be pushed when you save a contract.
When configuring the connection for line items on your contract you have three main options:
1. Push each main section; Services, Merchandise and Cash Advances/Disbursements.
Link each category from your Arranging Director Contract to an items in Quickbooks. Therefore only one item would appear per category grouping together the total of those items sold. This option will give basic information showing the form of revenue.
2. Push each sub-section from Services; Professional Services, Care and Preparation of Remains, Use of Facilities, Transportation etc..
Link each sub-category from your Arranging Director Contract to an items in Quickbooks. Therefore only one item would appear per sub-category grouping together the total of those items sold. This option will give more general information showing the stream of revenue.
3. Push each line item individually.
Link each line item from your Arranging Director Contract to an item in Quickbooks. Therefore each item sold in the Arranging Director Contract would be shown on the Quickbooks invoice. This option will give very detailed information in Quickbooks.
—> Configure Item (default) – If you do not have this service set up in QuickBooks, choose the QuickBooks Type and (if desired) the corresponding QuickBooks Account Number:
- Inventory Item
- Non-Inventory Item
- Service Item (default)
- Other Charge Item
—> QuickBooks Link – If you do have this service set up in QuickBooks, then select this option and select the appropriate Item from the ‘New/Changed Link’ dropdown. (The QB Item Name and Current Link Id fields will be blank if this is a new link.)
Once all relevant line items have been configured, click on the ‘Update QuickBooks Links’ button located at the bottom of the list, then check the Configuration Confirmation box at the top of the page.
Click on the blue swirl button (located at the top right of the Pulse System) to return to the Configuration Wizard and continue the set-up.
Need more help with this?
Don’t hesitate to contact us here.