
Step 3c: Product Configuration
Configure Confirmation
Confirm, by checking box, that the configurations below are correct and complete.
Configure / Establish Links
This section lists all products available in the Arranging Director contract; both shopping basket items and static line items. The shopping basket items are products in the FrontRunner Catalog that are flagged as ‘Show on merchandise list’. If you wish to view all products in your FrontRunner Catalog, click the ‘Show All’ button in to the right hand corner. The product configuration page will be sorted to showcase Caskets, Urns, Vaults, Clothing, Additional Merchandise and static line items in sections.
Each section will allow for two different configuration set ups:
1. Group Categories
By grouping categories you will be able to link all Casket items (as an example) to the same item within Quickbooks. When the contract pushes over from FrontRunner, the invoice within Quickbooks will only show the item it is linked to. No individual product reporting within Quickbooks can be done with this configuration, only general group reporting. To set this up, click ‘Group in QB’ check box that will be on the right hand side of the section header.
2. Individually Link Items
By individually linking each item to a Quickbooks item, the contract information passing through to Quickbooks will showcase a line item for each piece of merchandise and what that item is. With this configuration you will be able to more accurately run reports in Quickbooks showcasing products sold.
For each line item, ‘Select Configuration’. The options are:
—> Configure Item – Choose the QuickBooks Type and the corresponding QuickBooks Account number:
- Inventory Item
- Non-Inventory Item (default)
- Service Item
- Other Charge Item
—>QuickBooks Link – If you do have this product set up in QuickBooks, then select this option and select the appropriate Item from the ‘New / Changed Link’ dropdown. (The QB Item Name and Current Link Id fields will be blank if this is a new link.)
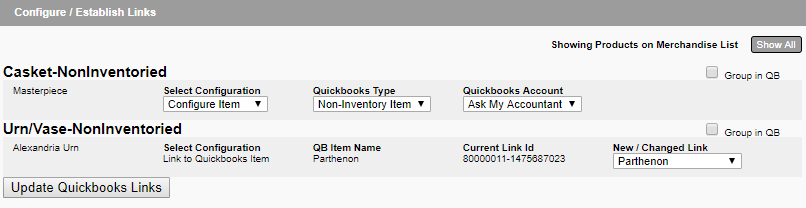
Once all relevant line items have been configured, click on the ‘Update QuickBooks Links’ button located at the bottom of the list.
QuickBooks Income Accounts: This section lists all income accounts including the type, name(s), and QB ListId reference number.
Click on the blue swirl button (located at the top right of the Pulse System) to return to the Configuration Wizard and continue the set-up.
Need more help with this?
Don’t hesitate to contact us here.