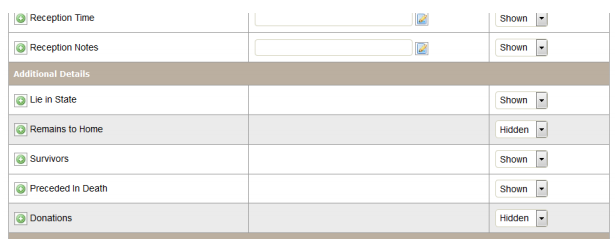
The system has pre-defined fields which are available to all funeral homes. You may set the default visibility settings for these fields on the Client Vitals and Services screens as either shown by default or hidden by default. If there is a data field that you never or seldom use, you may wish to hide it using this function.
Navigate to System Settings > Arranging Director Admin > Data Field Visibility Maintenance > Define and Maintain Vitals and Services Data Fields.
When the client Vitals or Service screen displays it will only show those fields that you have defined to be visible. Fields that you have set to be hidden by default will not show UNLESS you have entered data for that field for the particular client you are viewing.
The system pre-defined fields will have a Shown/Hidden drop down in the right hand column.

On the Client Vitals and Services page, there are buttons at the top of each page which allow you to change views to see all possible data rows or just your defined “default” data rows.

Certain pre-defined fields will allow you to set a synonym for the field text. If a field will allow a synonym there will be an input field in the “Optional Synonym” column. For example, you may wish for “Officiant” to be displayed as “Rabbi”. Simply add your text and click the edit button.

The text you have entered will show as the field name on the Vitals or Service screen. NOTE: you must use a synonym for the existing field since often times the data is used on forms and reports.
You also have the option to add your own data collection fields that are specific to your funeral home. Most of the fields on the Admin screen have a green add symbol next to the name. Clicking this button will allow you to enter fields which will display underneath that field. You may enter more than one field.

Adding a Custom Field
Simply type the name of the field and choose the data type of text, number, date or time. Make sure to click the green add button on the right to save your new field. If you wish to add more than one field underneath an existing field, just click the add button again.
You may set the display order of your fields by clicking the row and dragging to its new location. You may only re-order custom fields below the system field you added them underneath. For example, if Arranging Director – Administrative Menu you add a field under Music you may not drag it underneath the Cremation Date field. However, if you add more than one field under Music you may drag to reorder their display order underneath the Music field.
You may also remove custom fields from this screen by clicking the red delete icon. If you have never entered data for a field it will be deleted. Your custom field will be deprecated if data has been entered for the field for any client. Deprecating means that the field and its data will appear for any client it was entered on, but the field will not be available for any future clients nor will it appear on an existing client if data was never entered for that field.
← Arranging Director Admin QuickBooks Accounting Integration →
Need more help with this?
Don’t hesitate to contact us here.
